Trees are an essential part of almost any landscape. They are also one of the more challenging scenery projects. Commercially made trees are becoming increasingly realistic, but also increasingly expensive.
What Does a Tree Look Like?
Sounds like a silly question, right? Well if we all know how a tree is supposed to look, why is it so hard to make one in miniature? The biggest difficulty in modeling trees isn’t the materials, the tools or the skills required – it’s knowing what you want to model. Since childhood, we’ve learned that pine trees are green triangles and all other trees are fluffy round balls on a brown, vertical trunk. We also tend to reduce the actual scale of trees relative to other objects. So, if you try to model this “perfect” tree, you end up with a very unrealistic model, just as you would if you painted all of your water bright blue.
The beauty of nature is that there is no “standard” or “right” way to make a tree. Just like people, every one is unique. Trees have twists, bare patches and lopsided branches. Some are short and thin, others more than 100 feet tall. Then of course there are the many different colors – not just on autumn leaves either. Once you accept that you shouldn’t try to make your model trees perfect, you’ll find they are much harder to screw up!
As our display diorama is set in winter, most of the leaves have already been modeled on the ground, but we still need several trees. We’ll look at making three different types of tree in this blog. Just like Mother Nature, there are many more ways to model the many more types of trees you’ll find. But this will certainly get you started.
Evergreens
We’ll begin with a tall evergreen tree. Exactly what species this most closely represents – I’ll leave that to the arborists to debate. My goal – create a realistic looking model tree. Begin with the trunk, starting with a wooden dowel. How thick a dowel? How long? That all depends on the tree you want to model.
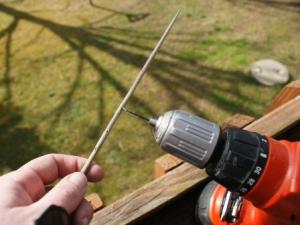
Taper the dowel to a point using a sander. You can add texture to the trunk by scraping it with a small-toothed sawblade. A hobby razor saw or a coping saw work well. Add color to the trunk with wood stain. Spray paint, or a wash of thinned oil or acrylic paints would work as well. Many colors will work and you can blend – just avoid colors with a high gloss.

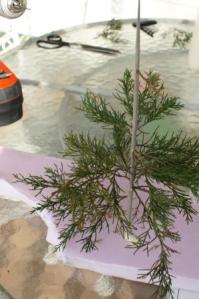
Pine branches are added to the trunk, working from bottom to top. A scrap of foam makes a great third hand.
Branches and leaves will be added one at a time to the trunk. You can add as many or as few as you’d like. You can use any number of dried flowers available at craft stores. For this first tree, I harvested my own, using fresh clippings from a spruce tree.
Clip the branches to size. You may do some more trimming once the tree is “finished.”
Drill holes in the trunk the same size as the clippings – most of mine were about 1/16″. Use a drill at low speed to bore the holes. Drill at different angles and rotate the trunk to place them all around the circumference. Try to stop the drill before poking through the other side, but if you do, it is no big deal. The scratches a holes will be hard to spot on the finished model.

Spray the finished tree with a clear flat finish to help protect the color. It is now ready to plant.
Secure the branches with a drop of wood glue. It helps to stick the trunk in a piece of foam for this step. When all the branches are in place, spray with a flat clear coat to help preserve the color. Since this will also make the branches tacky, you can sprinkle on a little fine-textured ground foam in the color of your choice for more effect.
Deciduous Trees
For deciduous winter trees, the branch structure is very important. We don’t have leaves to hide behind with these models. Again, you can find some good dried flower products at craft stores. For this project, I used a product marketed within the model railroad hobby as Super Trees. These tree kits use a dried natural material native to Scandinavia. The branch structure mimics that of larger trees very very well. Instructions can be found with their kits and on their website for adding leaves to these trees to model other seasons as well.

Gluing the small Super Tree branches onto larger branches from a real tree is tedious, but the final results are worth the work.
The only downside to this product is the width of the “trunk.” While these weeds work quite well “out of the box” for smaller trees, the base is just not substantial enough, especially in O Scale, to convey the mass of larger trees. To overcome this, we’ll adopt a similar approach as we did with the conifer. Instead of the dowel, we’ll start with small twigs and branches.
Select branches that fit your space and needs. You can break apart the Super Tree material into smaller pieces and attach these wherever you need some more fullness. These branches can be attached by drilling as before, or by scraping off a little of the bark and gluing directly onto the side of the branch. Tacky modeling glue works best here for its faster drying time.
It is best to work on a few trees at a time. That way you’ll be able to keep busy while glue hardens. You may still find you have to spread the work out over several evenings before you are completely satisfied. Once you are happy with the branch structure, allow the glue to dry then paint the entire tree with a gray primer spray paint. Don’t give up before you paint! I’ve had several trees that I thought were hopeless until a solid color pulled it all together.
In the interest of truth in advertising, the process of making these trees is actually much easier to describe than it is to perform. Like any modeling skill, it does get easier with practice. But don’t get discouraged if your first attempts end up buried someplace in the middle of the forest. Gluing little branches onto big branches is not the most relaxing way to spend an evening, but the results are worth it.
“Filler Trees”
Making individual trees as seen above is time consuming (and at times frustrating.) On a good evening of work, you’ll probably crank out 3 to 6 trees. That’s not bad if you’re building a diorama, but it can take a good while to forest an entire layout. Use your best super-detailed trees as foreground models. For the rest, you can fill in with smaller, more simplified trees.
Fill out the forest using the Super Trees (or other dried leave products) as they come. Simply paint and install. Packing the trees closer together and interspersing with the larger trees makes a very convincing canopy and forest without months of work. These trees also work well for yearlings and shrubs along a hedgerow or in the foreground as they have the same delicate branch structure.
When looking at a forest, it is impossible to tell which branches belong to each trunk. The same is true when clustering trees in miniature. You can easily fill out a forest by planting a few basic stems amongst your more detailed trees. You could even plant a large group of stems in the scenery first, and then simply fill in the branches on top. Only a very few of your trees need to be good enough to “stand alone.”
Planting
To plant your trees, simply drill a hole the size of the trunk in the foam scenic base. You will probably find you change bits very frequently. A small nail or pin can also be used, and can be a quick way to make the many small holes you’ll want for your forest of filler trees. Use a drop of wood or tacky glue to glue the tree into the hole.

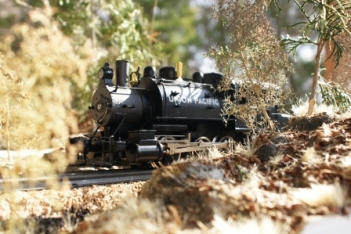
It doesn't take long before your trees are the perfect complement to the trains you want to photograph.
Nesting trees close to each other will help them support themselves. Clusters and groves of trees also usually look better than a single plant.
Remember when planting near tracks to keep branches a safe distance. A few foreground trees help provide depth to the scene, but use care when placing the trees near the edge of your layout as they will get bumped and dried branches are not very forgiving. Also, the idea of this diorama was to photograph and display the trains – that’s harder to do when they’re completely hidden by trees.
As you can see from some of the photos, our diorama is now very nearly complete. You may decide that for you, it is complete – and who could blame you! We’ll have one more how-to next week however to add some guard rails to our road and add to the winter chill with a little snow. Until then, happy planting!


